For hard-edged, intricate objects, the tool of choice is the Pen
tool. There are basically two ways to create a path with the pen tool (the path
is then later turned into a selection for masking). Clicking with the tool puts
down anchor points. Clicking and dragging with the tool, draws curved lines.
The curves of the lines are based on direction lines – the thinner lines that
come out of the anchor point when dragging. (There is also a Freeform pen tool
that can be used to draw paths and it has a magnetic option for making paths
based on edge contrast.)

At any time an anchor point or direction line can be targeted with the Direct Selection tool and moved to change the placement of the path. The direction lines can also be moved independently from each other by using the Convert Point tool on the direction line. A straight line can be made into a curve and vice versa by using the Convert Point tool on an Anchor point.
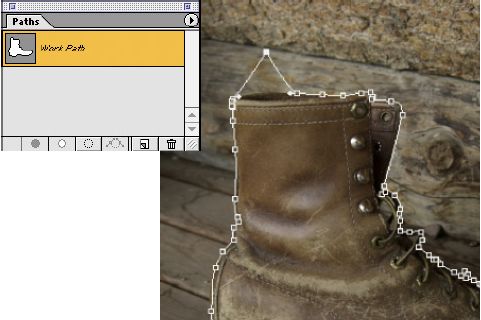
When the path is finished, use the fly out menu on the paths
palette to save the path and name it descriptively. Paths don’t take up very
much room in a file, so it’s better to save them if you think you’ll need then again
rather than having to recreate them. They also take up less room than a channel
so it’s more efficient to save the path. To make a selection from a path, use
the fly out menu and select “Make Selection”. Choose the amount of feathering
and click OK.

To turn the path into a mask, select Layer > Add layer Mask
> Reveal All.

Tidak ada komentar:
Posting Komentar