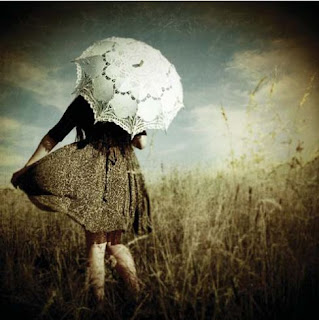
In
this tutorial, you are going to learn how to add clouds to a photo by using
layer masks, how to edit colours in Photoshop to give your image a vintage look
and how to work with layering textures. This tutorial is relatively easy, but
gives amazing looking results from the simplest tools.
Step 1
Open the original
image with the girl holding the umbrella in Photoshop. Press [C]
for the Crop Tool, and hold [Shift] down to crop
the image into a square. Use the Blur tool
with a brush of 70 px Diameter,
20% Hardness and 10% Strength to slightly blur down some
sections of the grass.
Step 2
Press [ Ctrl
]+[ J ] two
times to copy the background image twice. Make the top layer invisible by
pressing the eye, and make the middle layer active by clicking on it. Press [ Ctrl ]+[ M ] to bring up the curves box. This
section is all up to personal preference – move each of the red, green and blue
colour curves around to try and get something similar as the example, keeping
in mind that you are trying to bring out the reds more, keeping the greens out
of the image as much as you can. When you are happy with how it looks, press [OK]
and change the layer style to Color.
Step 3
Make the third
background layer visible and active. Press [ Ctrl ]+[ M ] to bring up the curves box. This
time while going through each of the colour curves, we are going to do the
opposite and bring out the yellows and green of the image. When you are happy
with how it looks, press [OK] and change the layer style to
Darken. Now your colours should
look almost as you want them to look in the fi nal image. Open the clouds image
and drag it on to the fi elds image in a new layer. Change the layer style to Overlay. With the clouds layer
selected, press the Add layer mask in
the bottom of the layers box. It is the second from the left and looks like a
square with a circle in it.
Step 4
To
start with, grab a brush of 100% Opacity,
175 px in Diameter, and 75% Hardness and press [ D ] to reset your colour palette, and
[ X ] to switch the colours around, so
white is in the foreground and black is in the background. Then proceed to get
rid of the entire bottom part of the clouds image where there are trees and
grass. With a brush of 100% Opacity,
75 px in Diameter and 75% Hardness, remove all the blue you can
see in the girl's dress.
Step 5
To make the final finishing
touches so the clouds blend in seamlessly with the fields, use a brush of 40% Opacity, 125 px in Diameter and 75% Hardness and dab and brush over and
over again at the edge of the fields until you are happy. The results are subtle,
but make a drastic impact over the look of the final image.
Step 6
At the moment, the
blue of the clouds are standing out compared to the rest of the image, so press
[ Ctrl ]+[ M ] to bring up the curves box with
the clouds layer selected. I used the following settings to give the clouds a
more vintage feel like rest of the image.
Step 7
Open the first rusty
and scratchy looking texture and drag it on to the image you are working on. Set
the layer style to Soft light and
Opacity to 64%. Press the Add layer mask and with a brush of
40% Opacity, 150 px in Diameter and 75% Hardness begin to remove some of the
intensity of the scratches around the middle area of the image.
Step 8
To tie in all the
elements of this picture, drag the final paper looking texture onto the image,
and set the layer style to Multiply and
Opacity to 100%.
By. Julia Trotti


Tidak ada komentar:
Posting Komentar