Selasa, 28 Februari 2012

ADD A KEYBOARD SHORTCUT FOR A FAVORITE FILTER


Did You Know
You can access the Keyboard Shortcuts and Menus dialog box by using the keyboard shortcut [ Ctrl+Shift+Alt+K ].

Try This
You can save and print a list of all keyboard shortcuts. Click Summarize in the Keyboard Shortcuts and Menus dialog box and save the file as Photoshop Defaults.htm. Open the file and print the list for reference.

PERSONALIZE YOUR VIEW OF BRIDGE


More Options
You can sort files using the Filter panel. For example, you can view only the portrait-orientation images or all the images created on a specific date. You can also compare images in the Preview panel by pressing Shift and clicking multiple images in the Content panel.

Enlarge It
Press Tab and the Preview window fills the screen as the other panels slide away on the sides. Press Tab again to return to your custom Bridge workspace.

Try This
Press [ Ctrl ] and click multiple images in the Content panel to compare them in the Preview panel. You can also stack the selected images by clicking Stacks and then Group or by pressing [ Ctrl+G ].

CUSTOMIZE YOUR WORKSPACE


Did You Know
You can return to the original default workspace any time by clicking Window, Workspace, and Essentials (Default) or by clicking Essentials in the Workspace pop-up menu on the top toolbar. You can also delete unused custom workspaces by clicking Window, Workspace, and Delete Workspace and selecting the one that you want to delete.

More Options
You can also change workspaces by clicking the name of the current workspace on the menu bar and then clicking another workspace from the pop-up menu.

Try This
Photoshop CS4 includes a number of predesigned workspaces for particular projects, such as Color and Tone or Painting. You can select a Photoshop CS4 predesigned workspace by clicking Window, selecting Workspace, and then clicking a specific workspace from the menu.

Senin, 27 Februari 2012

SET THE PREFERENCES


Did You Know
You can use keyboard shortcuts to set the Preferences. Press [ Ctrl+K ]. Set your options for the General Preferences. Press (Ctrl+2), and so on, for each of the Preferences panes.

Try This
You can change the default Preferences so that just pressing the appropriate letter toggles each tool. In the General Preferences pane, deselect the Use Shift Key for Tool Switch check box.

Did You Know
You can restore the Preferences any time by holding the [ Ctrl+Alt+Shift ] keys as you launch the application. Click Yes in the dialog box that appears, and the Preferences are reset to the defaults.

SELECT THE COLOR SETTINGS


Customize It
You can save your own Color Settings preset. The name of the preset changes to Custom when you deselect any check box or make any other changes. Click Save after customizing your settings. Type a name in the Save dialog box and click Save. Your customized preset appears in the Settings pop-up menu, ready for you to choose.

Try This
You can synchronize the color settings in other Creative Suite CS4 applications to match your saved custom Photoshop CS4 color settings. In Photoshop, click File and select Browse in Bridge. In Bridge, click Edit and select Creative Suite Color Settings. Click North America Prepress 2 and click Apply.

Kamis, 23 Februari 2012

Beauty Retouched


Step 1
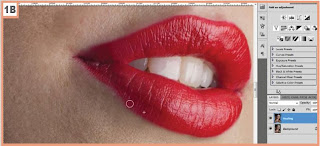
Open the picture, duplicate background layer and rename it in Healing. Select from the tools panel the Healing brush tool and remove all the imperfections of the skin as spots, pimples or little wrinkles. Then select the Clone stamp tool and with a size of 30 px, define the lip contour, cloning parts of lips with a single, continuous movement.


Step 2
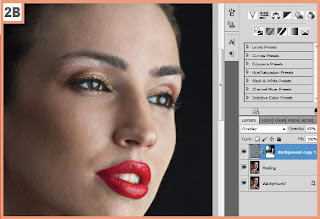
Now duplicate the Healing layer and call it High pass. Go in [ Filter ] [ Other ] [ High pass ] and set the radius on 10,0 px. Press OK. Set the blending mode of the layer to Overlay and add a layer mask filled with black to this layer menu [ Layer ] [ Add layer mask ] [ Hide all ]. Using a white brush with a size of about 300 px, paint in the blurry zone and the parts of the face that you want make more defined. Then reduce the layer’s Opacity ( to 60% for example ) to soften the image and give it a natural aspect.


Step 3
Now create a new group and call it Skin. Create a stamp of the layers shortcut [ Alt ]+[ Ctrl ]+[ Shift ]+[ E ], duplicate this layer and move the two layers into the group skin. Rename the layer below Blur and the layer above High pass. In the layer High pass, apply the High pass filter with a radius of 5 px and press OK. Set the blending mode of this layer to Soft light and go to [ Layer ] [ Layer mask ] [ Hide all ]. Now paint with a soft white brush only on the skin. Select Blur layer and go to  [ Filter ] [ Blur ] [ Gaussian blur ]  and set the radius to 60 px; press OK. Now apply a layer mask as we did in the High pass layer, and paint the skin again (with white). Lower the Opacity of this layer to about 55 %, to obtain a natural result.


Step 4
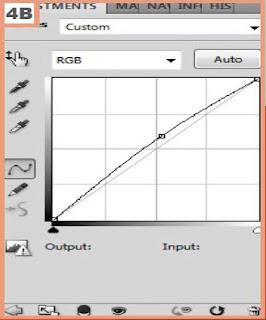
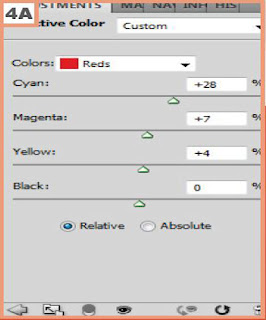
Now the finishing regulations. Create a new group and call it Adjustments. Create a new Selective color layer adjustment [ Layer ] [ New adjustment layer ] [ Selective color ] and set these values Colors Red : Cyan + 28 % ; Magenta + 7 % ; Yellow + 4 %; Create a new curves layer  [ Layer ] [ New adjustment layer ] [Curves ] and create a curve like this to illuminate the picture. Finaly, create a new levels adjustment layer  [ Layer ] [ New adjustment layer ] [ Levels ], from the dropdown menu select increase contrast 1 and you should obtain the final result.


Selasa, 21 Februari 2012

Smile

This tutorial shows how to improve your photos with a minimal amount of work, especially if you’re working with big batches or for presentations where finals are to be selected.

 
Step 1 
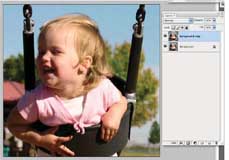
Open image and convert to CMYK : [Image] [Mode] [CMYK]. Drag the picture to a new layer. Now you have a copy that won’t be touched. We’ll clean and sharpen on background layer.


Step 2
[Filter] [Sharpen] [Unsharp Masking]. Amounts according to need.


Step 3
Clean up dirt, blemishes, etc. Zoom to at least 300% and use a grid [View] [Show]  [Grid] if the shot is large to be sure no areas are left out. Change grid size and color under  [Edit] [Preferences] [Guides Grids Slices].


Step 4
A simple curves move [Layer] [New adjustment layer] [Curves] will improve the contrast.


Step 5
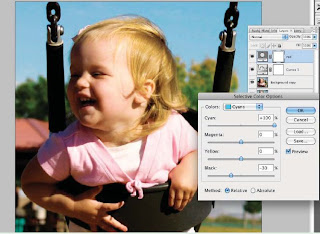
This photo is a little red and needs color correction especially the skin tones. [Layer] [New adjustment layer] [Selective color]. Choose Red then adjust the Magenta in the Red. I also adjusted the Cyan and Black in the blue sky. To finish up I erased some of the mask from the selective color around the red tile roof in the background and her hair. Now our photo is ready to view.


How to change eye color

Step 1
First open the photos, select the pupil of the eye using the method you prefer [ Polygonal lasso, Magnetic lasso, pen, etc...]. I used the Magnetic lasso in this case. Right click the mouse on the Selection and select New Layer via Copy. Rename the layer eyes.
 
  
Step 2
Make sure that in the Layers palette is selected layer eyes and from the menu [ Image ] [ Adjusment ] [ Hue/Saturation ]. When the window will be open, move the Hue's cursor until you find the satisfying color. If you want, from the same [ Hue/Saturation ] window we can also modify the saturation and brightness to achieve different effects. Here's an example: set the Hue value on 44. You can also customize more the color, using the color balance adjustment selected from the menu [ Image ] [ Adjustments ] [Color Balance ] and reduce the opacity of the layer eyes to adjust the effect.


Step 3
For a more aesthetic effect, you can use the Dodge tool selected from the Tools palette. Set Light to a 5-10 % opacity (or an opacity that allows to achieve the desired effect) and use Dodge tool within the colored part of the eye. Select Burn tool, (also an Opacity of 5%) set to Midtones and Burning to defi ne better the outline of the eye.